[UI] RAG Hallucination Test Quickstart
RAG Halluincation Test with DynamoEval UI (GPT-3.5-Turbo)
Last updated: Feb 27, 2025
This Quickstart showcases an end-to-end walkthrough of how to utilize DynamoAI’s platform solution to run RAG hallucination test assessing model vulnerability to hallucinations. It also covers some general guidelines and specific examples for setting up test configurations. We will create a test for GPT-3.5 as a running example.
If you are a developer and wish to follow the same quickstart with Dynamo AI’s SDK, we refer to the associated SDK Quickstart.
Create Model
Begin by navigating to the DynamoAI home page. This page contains the AI Systems – a collection of all the models you have uploaded for evaluation or guardrailing. It contains information to help you identify your model, such as the model source, use case, and date updated.
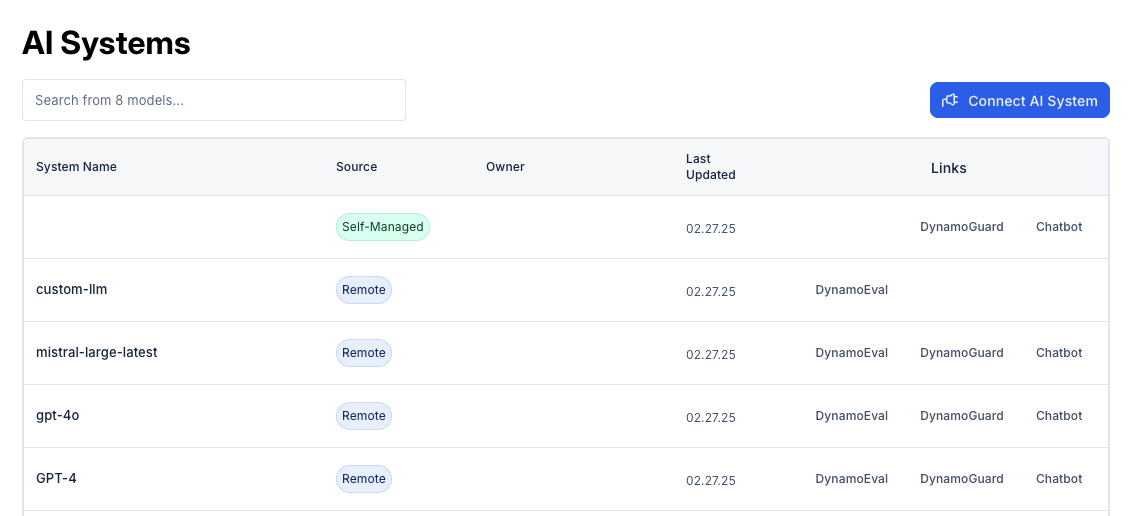
To connect to a new AI system, click the Connect AI System. When this button is clicked, a popup will appear, requesting more information about the model. This includes information such as the model name and use case. The popup will also request information about the model source. Remote inference can be used to create a connection with any model that is provided by a third party or is already hosted and can be accessed through an API endpoint. On the other hand, Local inference can be used to upload a custom model file.
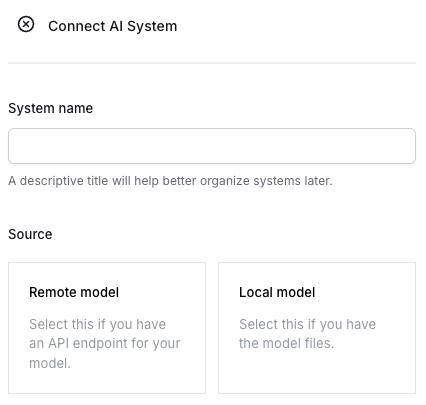
This includes information such as the model name and use case. The popup will also request information about the model source. Remote inference can be used to create a connection with any model that is provided by a third party or is already hosted and can be accessed through an API endpoint. On the other hand, Local inference can be used to upload a custom model file.
Example. For this quickstart, we recommend setting the following:
- Model name: “GPT-3.5 RAG”
- Model Source: Remote Inference
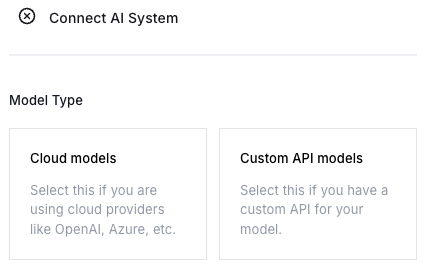
The next page will show model type from which you can choose either Cloud models, or models hosted on custom API endpoints.
Example. For this quickstart, click on Cloud models
The next page of the popup will ask for more detailed information to set up the API connection.
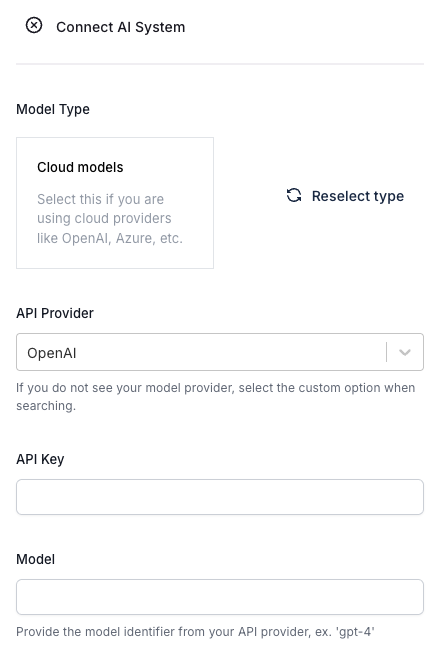
This includes information about the model provider, API access key, model identifier, as well as an optional model endpoint (if required by your API provider).
Example. We recommend setting the following:
- API Provider: OpenAI
- API Key: (your OpenAI API key)
- Model: gpt-3.5-turbo
After you click Submit, your model should have been created and should be displayed on the AI Systems page. Click on DynamoEval next to the model.
Create Test
To create a test for the created model, click on "DynamoEval" under Links column from the Model Registry page > Click on "Testing" tab > Click "New test" at the upper right corner.
Time to fill in the test information.
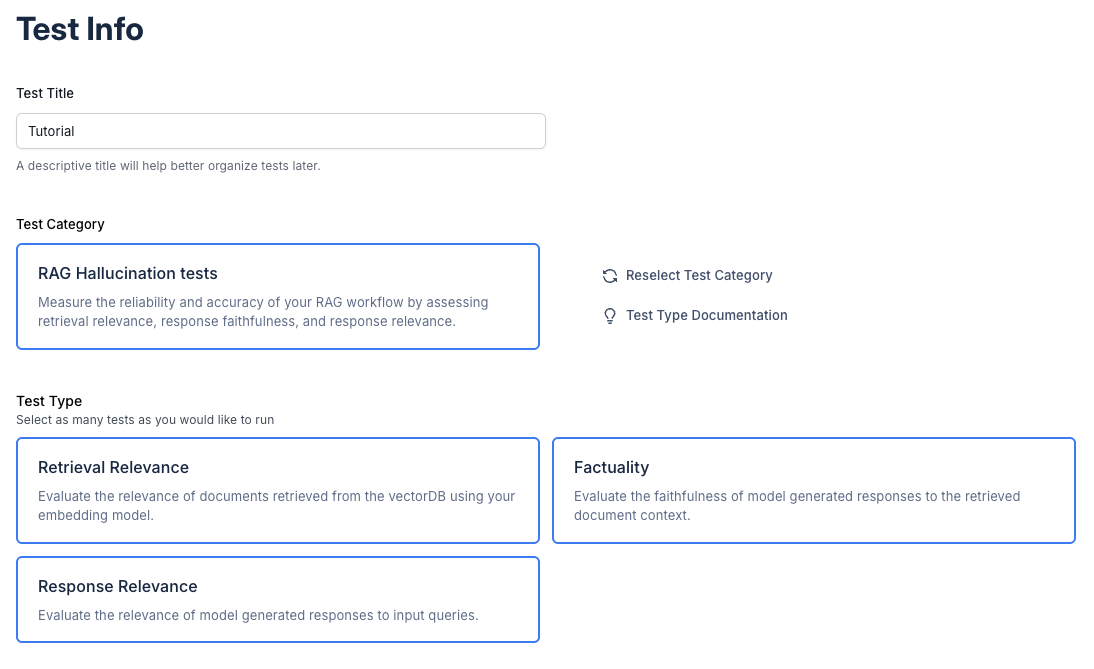
- Fill in the test title to be indicative of the test you are running.
- Under Test Category, Select “RAG Hallucination tests”
- Select all three Test types: “Retrieval Relevance”, “Factuality”, and “Response Relevance”.
Dataset Configuration
After selecting the test type, you’ll then be asked to select a dataset.
1. Select an Existing Dataset
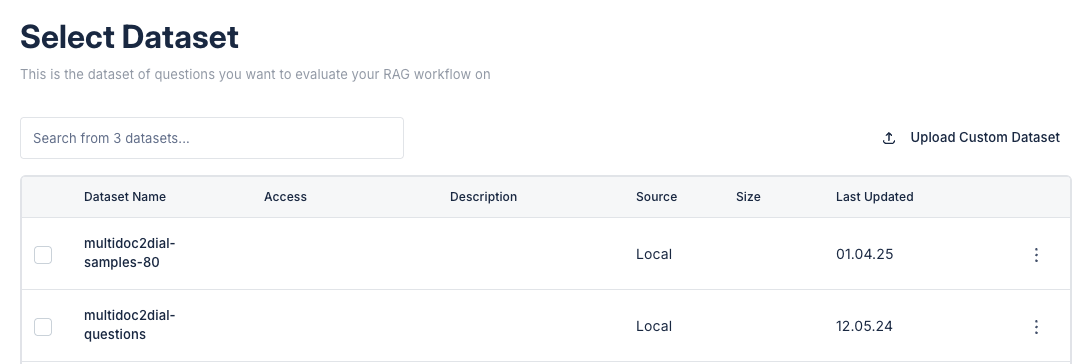
Here, you can select an existing dataset that has been previously uploaded. Click on the checkbox next to the dataset name. Skip to the next section if you are using the platform for the first time or would like to upload a new dataset.
2. OR Upload a New Dataset
Alternatively, you can upload a new dataset by clicking “Upload custom dataset” (upper right corner).
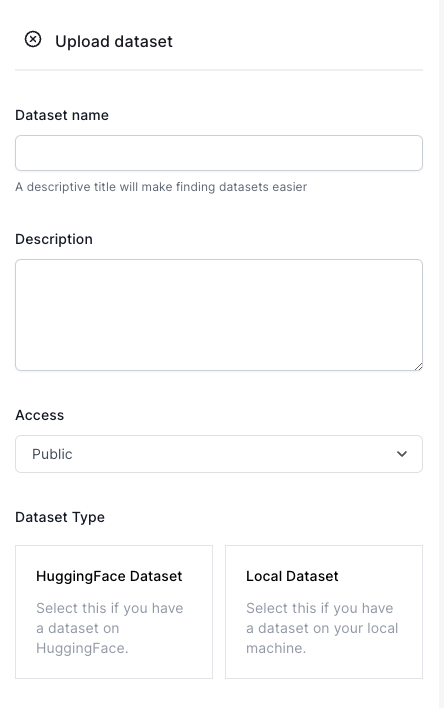
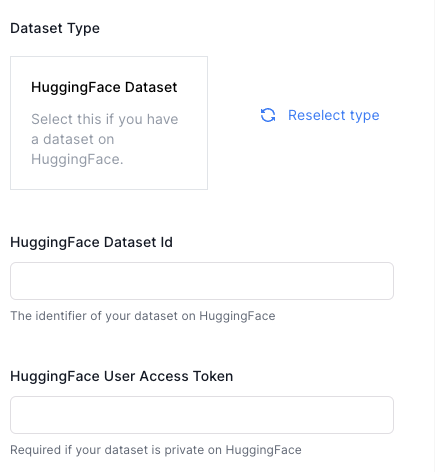
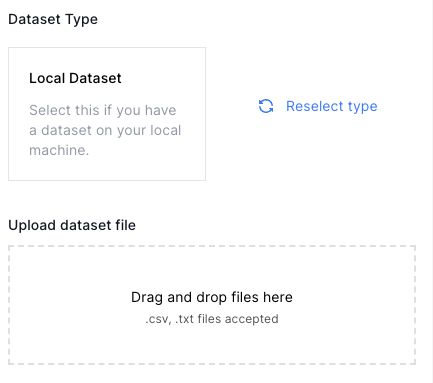
On the pop-up sidebar, you’ll be asked to provide a dataset name and description. We recommend you to be specific so you can clearly identify the dataset in the future. Set up an access level. Finally, you’ll be asked to upload a dataset. Currently, DynamoAI supports running attacks and evaluations on CSV datasets (Local Dataset), or those reside in HuggingFace hub (HuggingFace Dataset).
 |  |
|---|
- For HuggingFace Dataset (left), you will be asked to fill in the Dataset ID and the access token, which will be required if the dataset is private.
- For Local Dataset (right), you will be asked to drag and drop the CSV file.
For RAG Hallucination Test, the dataset must contain the input queries the RAG system will be receiving for evaluation in a single column/feature. For instance, if using the HuggingFace Dataset, the dataset should contain a list of input queries as one of the features; if using the Local Dataset, the CSV file should contain a single column that has the input queries.
Note: The uploaded local dataset should satisfy the following conditions:
- All rows and columns should contain strings of length at least 5.
- There must be at least one column populated with the data points of queries that will be used as the input for the RAG system.
- The number of data points should be more than 10.
- The number of data points should be no more than 100.
- The uploaded CSV file must be parseed with
pandas.read_csv()method without any errors. - The first row of the CSV file should be names of the column (i.e., it should not be a data point)
Example. For this tutorial, select "Local Dataset". We recommend uploading one of these files:
- multidoc2dial-conv-test-quickstart.csv: This is a sample dataset processed from Multidoc2dial dataset which has a column called “queries” that contains conversation between a User and an Agent about various topics that ends with a question from the User.
- fintabnetqa-sujet-mixed-49.csv: This is a sample dataset sourced from TableVQABench dataset and Sujet Financial Dataset for Q&A on financial documents and tables.
3. Configure Dataset
This step ensures that DynamoEval tests can refer to the correct column(s) from the dataset.
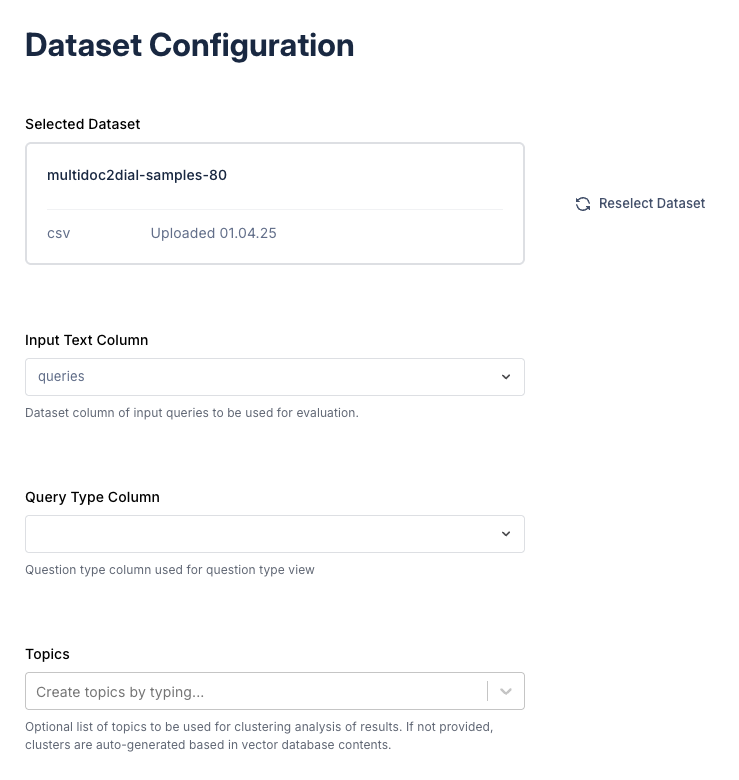
Input text column: specify this as the column name (or feature name) of the dataset containing input queries the RAG system will receive. This is the only column that DynamoEval will use for the tests (unless you specify the Query Type Column; see next).
Query Type Column: optinal column to refer to from the uploaded datsaet. If set, it will be used to cluster the queries to show more fine-grained analysis of results based on the query type.
Topics: optional list of topics that will be used to cluster the queries to show more fine-grained analysis of results. If not provided, the topics will be auto-generated by extracting keywords from each cluster.
Example. We recommend using the following configurations:
- Input text column: queries
- Query Type Column: (leave blank)
- Topics (for
multidoc2dial-conv-test-quickstart):department of motor vehicles,student scholarship and financial support,veteran benefits and healthcare,social security services - Topics (for
fintabnetqa-sujet-mixed-49): Leave it as blank
Vector Database Setup
DynamoAI currently supports RAGs with three types of vector databases through the UI:
- ChromaDB
- Databricks VectorSearch
- Postgres VectorDB
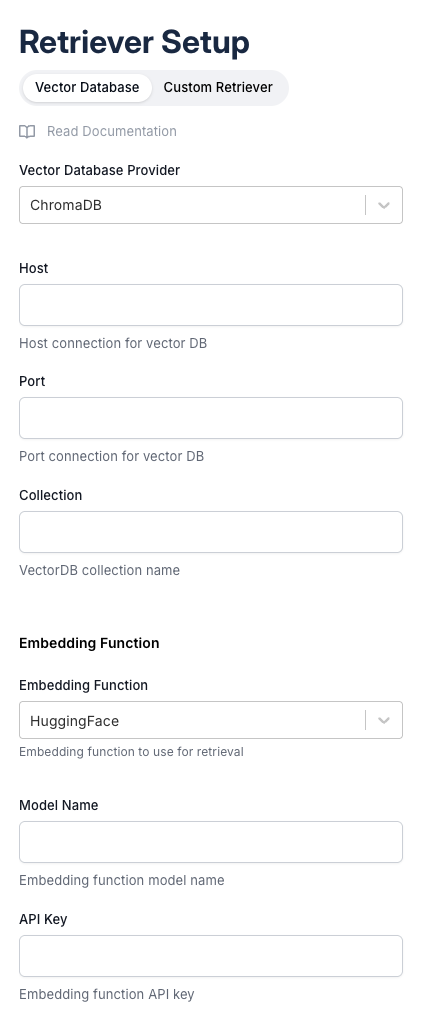
For this tutorial, we will walk through setting up ChromaDB. To create a ChromaDB object, DynamoAI requires the host, port, and collection name of a persistent database instance, and embedding functions used to create the vector database. The database instance must be hosted in the same VPC as your DynamoAI deployment.
Example. DynamoAI has a ChromaDB instance running on DynamoAI’s production pod, which has collections named “multidoc2dial” and "fintabnetqa_10k_mixed" that are each populated with context documents from the MultiDoc2Dial dataset and Fintabnet dataset respectively, embedded with Sentence Transformer model “all-MiniLM-L6-v2”. Accordingly, we recommend the following configuration:
For multidoc2dial-conv-test-quickstart dataset:
- Vector Database Provider: Chroma
- Host: https://chromadb.internal.dynamo.ai
- Port: 8000
- Collection: multidoc2dial
- Embedding Function: Sentence Transformer
- Model Name: all-MiniLM-L6-v2
or for fintabnetqa-sujet-mixed dataset:
- Vector Database Provider: Chroma
- Host: https://chromadb.internal.dynamo.ai
- Port: 8000
- Collection: fintabnetqa_10k_mixed
- Embedding Function: Sentence Transformer
- Model Name: all-MiniLM-L6-v2
If you need help setting up a Chroma vector database with your own data, please reach out to our team.
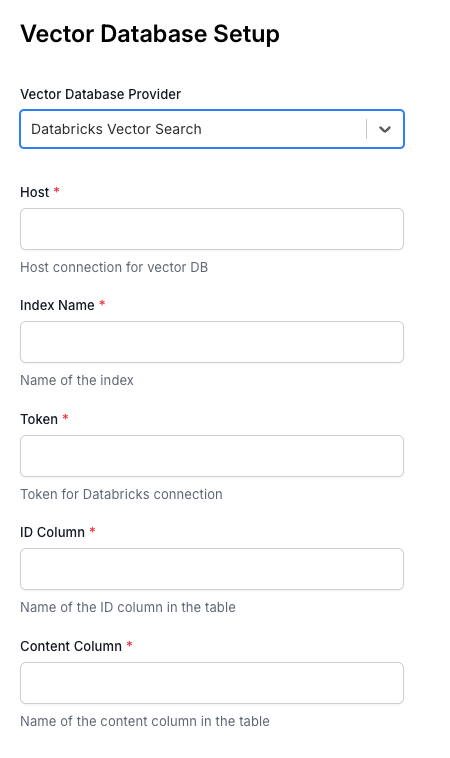
Alternatively, Databricks VectorSearch and Postgres VectorDB setup each requires the following fields:
 | 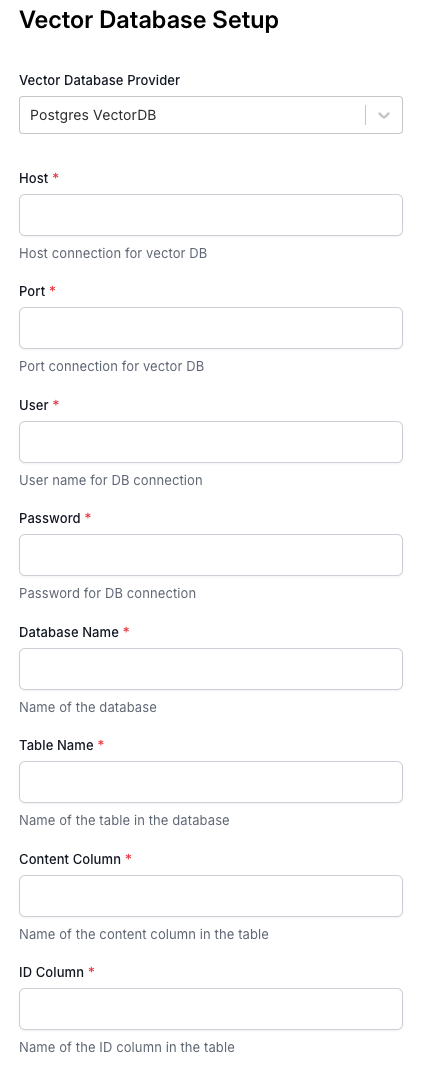 |
|---|
Also you can set up a connection to a retriever that is hosted on a custom endpoint. For more information on connecting to a custom retriever, please see here.

Test Parameters Setup
This page will allow you to vary different test parameters to observe performance across different settings. You are able to set up a range of values with min, max, step sizes so that the tests can run with different combinations of parameters in a sweeping manner.
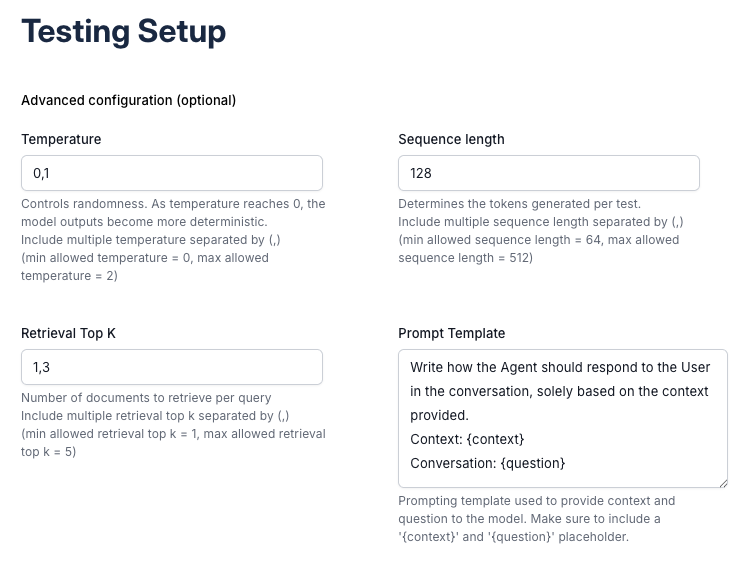
- Temperature: this controls the randomness of the generation (larger values yield more random generation)
- Retrieval Top K: this controls the number of documents to retrieve and use as context for the generation model. Note that increasing the retrieval top k value can result in input sequence cutoffs for generation models that have smaller context windows.
- Sequence length: this controls the maximum length of the generated sequence. If the response needs to be longer, increase the size. If this value is too small, the response may get cut off.
- Prompt template: this is the prompt template that will be used to synthesize the question from the uploaded dataset, and the context retrieved from the vector database, before it is fed to the generator model for the final response output. The retrieved contexts will be concatenated and formatted into the
{context}placeholder, and the query will be formatted into the{question}placeholder. So it is necessary for the template to have both placeholders.
Example. We recommend the following configurations:
- Temperature: 0, 1 – it will sweep through two temperature settings: 0, 1
- Retrieve Top K: 1, 3 (default values) – it will sweep through two settings: K=1 and K=3.
- Sequence length: 128 - it will sweep through one setting: 128
- Prompt Template (for
multidoc2dial-conv-test-quickstartdataset):
Write how the Agent should respond to the User in the following conversation, solely based on the context provided.
Context: {context}
Conversation: {question}
- Prompt Template (for
fintabnetqa-sujet-mixeddataset):
Answer the following question based on the context provided.
Question: {question}
Context: {context}
Answer:
After this step you will see a summary page. If everything looks good, click “Create Test” to finish the test setup and queue the test.
Checking Results
After queueing the test, you will see three indicators on the model’s Testing tab: Complete, In Progress, Awaiting Resources.

Once the test is marked complete, you can look through the rest results in 3 different ways:
- Dashboard: In the Dashboard tab, examine the key metrics.
- Deep-dive: Under the Testing tab, click on “View Test Details” for the test.
- See report: Under the Testing tab, click on the drop down arrow on the right for the test, and click “Download report” to view the generated RAG Hallucination Test report.